A well pump is the heart of a private water system. When it functions properly, water flows smoothly from every faucet, showers maintain strong pressure, and household appliances operate without interruption. Because everything works as expected, most homeowners rarely think about the pump itself.
However, when a well pump stops working, the impact is immediate. Water pressure disappears, faucets run dry, and daily activities such as showering, cooking, and laundry become difficult. Many homeowners assume the pump has completely failed and that replacement will be expensive. In reality, most well pump issues follow predictable patterns and can often be resolved with straightforward troubleshooting.
In this guide, you will learn how to fix a well pump by identifying common problems, diagnosing their causes, and applying clear step-by-step solutions. By the end, you will understand how to resolve issues such as no water, low pressure, constant running, short cycling, and electrical faults safely and confidently.
Understanding the Basics Before You Fix a Well Pump
Before you start fixing anything, you need to understand what you are working with. This section gives you a quick and clear overview so you can troubleshoot with confidence. Most residential systems include:
- The well pump (submersible or jet pump)
- A pressure tank
- A pressure switch
- Pipes and wiring
When you open a faucet, water leaves the pressure tank. The pressure drops. The pressure switch senses the drop and turns the pump on. The pump refills the tank. Once the pressure reaches the set level, the switch turns the pump off.
If any part fails, the entire system feels the impact. So when you fix a well pump, you must think about the whole system.
Common Types of Well Pumps
Before you fix a well pump, you need to know which type you have. The repair approach can vary depending on the design and location of the pump. Most residential properties use one of the following two types:
| Pump Type | Installation Location | Best Suited For |
|---|---|---|
| Submersible Pump | Installed inside the well, fully submerged in water | Deep wells (typically over 25 feet) |
| Jet Pump | Installed above ground, usually in a pump house or basement | Shallow to moderately deep wells |
A submersible pump sits deep inside the well and pushes water upward into your home. Since it operates underwater, it runs quietly and handles deeper water levels efficiently.
A jet pump stays above ground and pulls water from the well using suction. These pumps work well for shallow wells and allow easier access for repairs.
Each type requires slightly different repair steps because of its location and design. However, the troubleshooting process follows the same logic: check power, inspect pressure components, test the tank, and look for mechanical wear. Once you identify your pump type, you can approach repairs with more confidence and accuracy.
You may also know: Tips to Prevent Clogged Drains in Showers
Common Well Pump Problems and How to Fix Them
Well pump issues usually follow clear patterns. When you diagnose the symptom correctly, you can fix the root cause without wasting time or money. Let’s walk through each problem thoroughly.
Problem #1: No Water at All
Nothing creates panic faster than turning on a faucet and getting nothing. No pressure. No sound. No warning. Before assuming the pump has failed completely, you need to go through a logical diagnostic process. In many cases, the fix turns out to be simpler than expected.
What Causes No Water?
- Tripped circuit breaker
- Blown fuse
- Faulty pressure switch
- Failed pump motor
- Loose or damaged wiring
- Extremely low water level in the well
Now let’s fix it properly.
How to Fix No Water Issue
Step 1: Confirm the Pump Has No Power
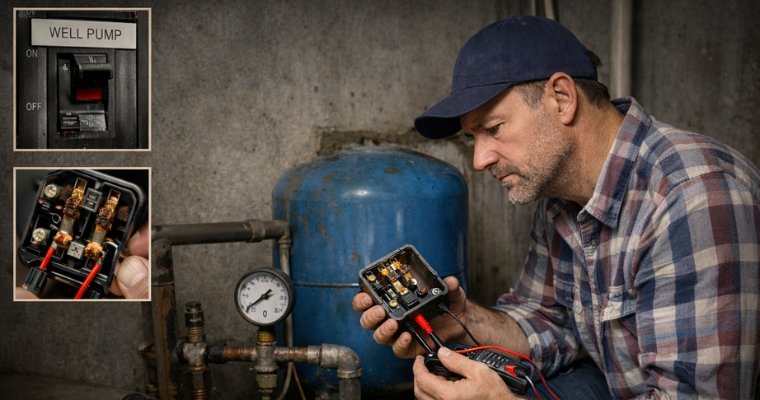
Start at your electrical panel. Look for the breaker labeled “Well Pump.” If you see it in the middle position or flipped off:
- Turn it fully off first.
- Then turn it back on firmly.
- Listen carefully for the pump to start.
If the breaker trips again immediately, stop. That usually indicates a short circuit, damaged wiring, or a seized motor. Do not keep resetting it. Repeated resets can overheat the wiring and cause serious damage.
If the breaker stays on but the pump remains silent, continue to the next step.
Step 2: Check the Pressure Switch Carefully
Turn off power to the pump before opening the pressure switch. Remove the cover. You will see small metal contact points inside. These contacts close to send power to the pump. Inspect closely for:
- Burned or blackened contacts
- Pitting or heavy corrosion
- Dirt, insects, or debris blocking movement
- Loose terminal screws
If the contacts look burned or severely worn, replace the switch. Pressure switches cost far less than a pump, and they commonly fail before the pump does.
If the contacts look dirty but not destroyed, you can gently clean them with fine sandpaper. Restore power and see if the pump starts.
If the pump still does not activate, continue.
Step 3: Check the Pressure Tank
A pressure tank that fails to maintain proper air pressure can prevent the pump from operating correctly. Turn off power. Open a faucet and drain all water from the tank. Once empty:
- Locate the air valve at the top of the tank.
- Use a tire pressure gauge to check air pressure.
- Compare the reading to your system’s cut-in setting.
Example: If your system runs at 30–50 PSI, the tank air pressure should measure 28 PSI.
If the pressure reads too low, add air using an air compressor. Recheck the reading. Restore power and test the system.
If the tank will not hold air, the internal bladder has likely failed. Replace the tank.
Step 4: Evaluate the Pump Motor
If power reaches the switch, the switch works, and the tank has proper pressure, the pump motor may have failed. Signs of motor failure include:
- Complete silence when power is on
- Breaker trips instantly
- A low humming sound without water movement
Submersible pump replacement requires pulling the pump out of the well. This job involves specialized tools and often requires two or more people. If you suspect motor failure, contact a licensed well technician.
When to Call a Professional
- The breaker continues to trip
- You suspect motor failure
- The pump sits deep in the well
- You feel unsure about electrical testing
Electrical and deep-well repairs require proper equipment and safety knowledge.
Problem #2: Low Water Pressure
Low water pressure develops gradually or suddenly. Showers feel weak. Faucets trickle. Appliances take longer to fill. This issue frustrates homeowners, but in most cases, you can fix it with careful inspection and small adjustments. Common Causes
- Incorrect pressure switch setting
- Low air pressure in the tank
- Clogged sediment filter
- Partially blocked pipes
- Worn pump components
Let’s fix it step by step.
How to Fix It Low Water Pressure Issue
Step 1: Read the Pressure Gauge
Locate the pressure gauge near the tank. Turn on a faucet and observe how the pressure behaves:
- Does it drop quickly?
- Does it struggle to reach shut-off pressure?
- Does it stop below normal range?
Most residential systems operate at either:
- 30–50 PSI
- 40–60 PSI
If your system never reaches the upper number, pressure adjustment or pump wear may be the issue.
Step 2: Adjust the Pressure Switch Correctly
Turn off power before making adjustments. Inside the pressure switch, you will see adjustment nuts.
- The large center nut adjusts both cut-in and cut-out pressure.
- Turn it clockwise to raise pressure.
- Turn it counterclockwise to lower pressure.
Make one full turn only. Restore power and test. Never make large adjustments at once. Excessive pressure can damage plumbing and overwork the pump.
Step 3: Check and Correct Tank Air Pressure
Improper tank air pressure causes weak performance and unstable pressure. Turn off power and drain all water from the tank. Use a tire pressure gauge on the air valve. The reading should measure 2 PSI below the cut-in pressure.
Example:
- If your system runs at 40–60 PSI, your cut-in equals 40. The tank air pressure should measure 38 PSI.
- If it reads lower, add air slowly using an air compressor. Recheck and adjust carefully.
- Restore power and test the system again.
Step 4: Inspect for Blockages
Low pressure often results from simple clogs. Check:
- Sediment filters
- Water softener bypass settings
- Faucet aerators
- Shower heads
Replace dirty filters immediately. Remove and rinse aerators. Even small sediment buildup can restrict water flow significantly.
Step 5: Evaluate Pump Wear
If pressure adjustments and clog removal do not solve the issue, the pump impeller may have worn down. Worn impellers reduce pumping strength over time.
In this case, replacement may provide the most practical solution.
Problem #3: Pump Runs Constantly
A well pump should turn on, build pressure, and then shut off. If the pump runs continuously, something prevents the system from reaching the shut-off pressure. This situation wastes electricity, overheats the motor, and shortens the life of the pump. The sooner you diagnose the cause, the better chance you have of preventing expensive damage.
Why the Pump Runs Without Stopping
- Water leak somewhere in the plumbing system
- Pressure switch stuck in the closed position
- Pressure tank losing air pressure
- Failing check valve
- Worn pump impeller
Before assuming the pump has failed, start with the simplest inspections.
How to Fix The Pump Runs Without Stopping Issue
Step 1: Look for Water Leaks in the System
A pump cannot shut off if water continuously leaves the system. Even a small leak forces the pump to keep running to maintain pressure. Start by inspecting visible plumbing areas:
- Basement pipes
- Utility rooms
- Outdoor hose bibs
- Irrigation connections
Look for damp spots, dripping valves, or puddles forming near pipes. Check the yard as well. Wet soil or unusually green grass may indicate an underground leak.
If you find a leak, shut off the water supply and repair the pipe or fitting. Once the leak stops, the pump should begin cycling normally again.
Step 2: Inspect the Pressure Switch
A pressure switch controls when the pump starts and stops. If the contacts stick together, the pump will continue running even after reaching normal pressure.
Turn off power to the pump. Remove the pressure switch cover and examine the contacts. Check for:
- Burned metal contacts
- Dirt buildup preventing movement
- Corrosion or debris inside the mechanism
If the contacts appear welded together or heavily damaged, replace the pressure switch. This component is inexpensive and commonly causes continuous pump operation.
After installing a new switch, restore power and monitor the system to confirm normal cycling.
Step 3: Test the Pressure Tank
The pressure tank stores water under air pressure. If the tank loses its air cushion, the pump struggles to reach the correct shut-off pressure. To test the tank:
- Turn off power to the pump.
- Open a faucet and drain all water from the system.
- Locate the air valve at the top of the tank.
- Check the pressure using a tire pressure gauge.
The air pressure should measure 2 PSI below the pump’s cut-in pressure. For example:
| System Pressure Range | Correct Tank Air Pressure |
|---|---|
| 30–50 PSI | 28 PSI |
| 40–60 PSI | 38 PSI |
If the air pressure is too low, add air with a compressor. Restore power and test the system again.
If the tank fails to hold air, the internal bladder has likely ruptured. In that case, replacing the tank will solve the problem.
Step 4: Check the Well Check Valve
The check valve prevents water from flowing back down into the well after the pump shuts off. If this valve fails, pressure drops immediately after the pump stops, forcing it to run again. Signs of a bad check valve include:
- Rapid pressure drop after the pump shuts off
- Frequent pump cycling even without water use
Replacing the check valve usually restores stable pressure and normal pump operation.
Problem #4: Short Cycling (Pump Turns On and Off Rapidly)
Short cycling occurs when the pump starts and stops every few seconds. Instead of running long enough to build pressure properly, the pump keeps restarting. This behavior places heavy strain on the motor and dramatically shortens its lifespan.
Short cycling almost always points to a problem with the pressure tank. Common Causes
- Waterlogged pressure tank
- Incorrect air pressure in the tank
- Ruptured bladder inside the tank
- Pressure switch set incorrectly
Understanding the tank’s role will help you fix this issue quickly.
How to Fix Short Cycling Issue
Step 1: Drain the Pressure Tank Completely
Turn off power to the well pump.
Open a faucet inside the home and allow all water to drain from the system. Leave the faucet open until water stops flowing completely. This step removes pressure from the tank and prepares it for inspection.
Once empty, close the faucet.
Step 2: Check the Tank Air Pressure
Locate the air valve on top of the pressure tank. It looks similar to a valve on a car tire.
Use a tire pressure gauge to measure the air pressure inside the tank.
The reading should be 2 PSI below the pump’s cut-in pressure.
| Pump Setting | Correct Tank Air Pressure |
|---|---|
| 30–50 PSI | 28 PSI |
| 40–60 PSI | 38 PSI |
If the pressure reads too low, add air slowly using an air compressor. Check the reading again to ensure accuracy.
Step 3: Check for a Waterlogged Tank
Tap the tank gently with a screwdriver handle. Listen to the sound:
- A hollow sound at the top and solid sound at the bottom usually indicates normal operation.
- A completely solid sound may indicate the tank has filled entirely with water.
A waterlogged tank cannot regulate pressure correctly and often causes short cycling.
If draining and adding air does not fix the issue, the tank bladder may have failed.
Step 4: Replace the Pressure Tank if Necessary
If the tank repeatedly loses air pressure or remains waterlogged, replacing it becomes the best solution. Modern bladder tanks maintain pressure more effectively and protect the pump from excessive cycling.
Once installed, restore power and monitor the pump cycle. A healthy system should run for longer periods and shut off smoothly.
Problem #5: Dirty or Muddy Water
Clean well water should appear clear and free from sediment. If you suddenly notice cloudy, sandy, or muddy water, something has disturbed the well system. Ignoring this issue can damage the pump and clog household plumbing.
Identifying the source quickly helps prevent long-term problems. Possible Causes
- Sediment buildup inside the well
- Damaged or deteriorating well screen
- Pump positioned too close to the bottom of the well
- Falling water levels exposing sediment
Sediment problems often develop slowly but can appear suddenly after heavy water usage or seasonal changes.
How to Fix Dirty or Muddy Water Issue
Step 1: Reduce Water Usage Temporarily
Heavy water use can stir sediment inside the well. Reduce water consumption for several hours and allow the well to settle.
Avoid running multiple appliances at once while diagnosing the issue.
Step 2: Check and Replace Sediment Filters
Most well systems include sediment filters designed to trap sand and debris before the water enters your home.
Inspect the filter housing and remove the filter cartridge.
If the filter appears clogged, discolored, or packed with debris, replace it immediately. A blocked filter not only affects water quality but also reduces water pressure.
Install a new filter and run the water for several minutes to flush the system.
Step 3: Listen for Unusual Pump Behavior
Sediment entering the pump can cause unusual sounds or vibrations. Listen for:
- Grinding noises
- Increased vibration
- Reduced water flow
These signs may indicate sand entering the pump impeller. If sediment continues appearing after replacing filters, professional inspection becomes necessary.
Step 4: Schedule Well Inspection if Muddy Water Continues
Persistent muddy water may indicate damage inside the well itself, such as a broken screen or pump positioned too low.
A well technician can inspect the system using specialized equipment and determine whether the pump needs repositioning or the well requires cleaning.
Most well pump issues develop gradually and show clear warning signs. When you follow a systematic troubleshooting process, you can often identify the cause quickly and restore normal operation without replacing the entire pump system.
You may also read: How to Increase Water Pressure in Home?
Electrical Issues When You Fix a Well Pump
Electrical faults cause a large percentage of well pump failures. Pumps rely on stable power and properly functioning control components. When electrical connections fail, the pump may stop running, trip breakers, or operate unpredictably. Before inspecting any wiring or electrical component, always turn off the power at the breaker panel. This step protects you from electric shock and prevents accidental damage to the system. Common Electrical Fixes
- Replace Blown Fuses
Some well pump systems use fuses to protect the motor and control box. If a fuse blows, the pump will stop receiving power. Remove the fuse and inspect it for a broken filament or burn marks. Replace it with a fuse that matches the exact amperage rating recommended for your pump system. Using the wrong size fuse can damage the motor. - Tighten Loose Wire Connections
Loose wires interrupt power flow and can cause the pump to stop or run inconsistently. After shutting off power, open the control box or pressure switch and check the terminal connections. Tighten any loose screws and ensure each wire sits firmly in place. Even a slightly loose connection can prevent the pump from starting. - Replace a Damaged Control Box
Some pumps, particularly submersible systems, rely on a control box that contains start relays and capacitors. If the box fails, the pump may hum but never start. Look for signs such as burned wiring, melted insulation, or a strong electrical smell. Replacing the control box often restores proper pump operation.
If you feel unsure about any electrical repair, contact a licensed electrician or well technician. Electrical safety should always come before convenience.
Required Tools for Fixing a Well Pump
Before you begin troubleshooting or repairing a well pump, gather the necessary tools. Having the right equipment nearby allows you to work efficiently and reduces unnecessary delays during the repair process. Below are some of the most useful tools for diagnosing and fixing common well pump issues:
| Tool | Purpose |
|---|---|
| Adjustable wrench | Tightening or loosening pipe fittings and pump components |
| Screwdrivers | Opening control boxes, switches, and panels |
| Tire pressure gauge | Measuring pressure tank air charge |
| Multimeter | Testing electrical voltage and continuity |
| Air compressor | Restoring air pressure inside the tank |
| Replacement pressure switch | Fixing common pressure control failures |
Keeping these tools organized before starting the repair allows you to move through each troubleshooting step without interruption. Preparation often makes the repair process smoother and less stressful.
Preventive Maintenance Tips to Avoid Needing to Fix a Well Pump
Fixing a well pump takes time and effort. Preventive maintenance helps you avoid unexpected breakdowns and expensive repairs. By monitoring key components regularly, you can detect small issues before they develop into major failures and require you to fix a well pump unexpectedly.
Simple Maintenance Checklist
Use the following routine checks to keep your well system operating efficiently:
- Inspect the pressure gauge once a month to confirm the system cycles normally.
- Test the pressure tank air charge at least twice each year.
- Replace sediment filters regularly to prevent clogs and pressure loss.
- Check visible pipes and fittings for leaks or moisture.
- Listen for unusual sounds when the pump turns on or off.
These simple habits help extend the life of your well pump, reduce unexpected failures, and minimize the need to fix a well pump in emergency situations.
When to Replace Instead of Trying to Fix a Well Pump
While many well pump problems can be repaired, some situations make replacement the more practical option. Pumps wear down over time, and repeated repairs can quickly become expensive. Consider replacing the pump if you notice the following conditions:
- The pump is more than 10–15 years old.
- Repair costs exceed half the price of a new system.
- The motor fails repeatedly or overheats often.
- The pump struggles to maintain pressure even after repairs.
Modern well pumps operate more efficiently and often consume less electricity than older systems. Installing a new pump can improve system performance and eliminate recurring problems that require you to fix a well pump repeatedly.
You may also explore: Ultimate Guide to Becoming a Professional Plumber
Safety Guidelines When You Fix a Well Pump
Safety should always remain your top priority when working on a well system. Pumps combine electricity, water pressure, and mechanical components, which can create dangerous conditions if handled improperly. Follow these safety practices whenever you perform a repair:
- Turn off power at the breaker panel before inspecting the pump or wiring.
- Avoid working around wet electrical equipment.
- Use insulated tools when handling electrical connections.
- Wear protective gloves and safety glasses during repairs.
- Never reach into a well or attempt pump removal without proper equipment.
Taking a few extra precautions protects both you and your well system during the repair process.
Final Thought
A well pump serves as the foundation of your home’s private water system. When it stops working, everyday activities quickly become difficult. Fortunately, many well pump problems develop from simple causes such as power interruptions, pressure tank issues, or clogged filters. By inspecting the system step by step and addressing the most common faults first, you can often restore normal water flow without replacing the entire pump. Regular maintenance, careful troubleshooting, and attention to warning signs will keep your well system running reliably for many years.